

Boxing Bag Hanger Manufacturer Advice for Choosing the Strongest Mount
2026-09-30
You’ve seen it before—a heavy bag crashes down mid-session because the mount wasn’t built for real force. Choosing the strongest hanger isn’t just about weight limits; it’s about understanding your ceiling, wall structure, and the type of training you do. As a leading boxing bag hanger manufacturer, PandaWin Sports has tested mounts across thousands of setups. This guide distills what actually matters before you drill a single hole.
Start With the Wall, Not the Mount
Most people fixate on the bracket first, but the wall is where the real work begins. Drywall, plaster, brick, or concrete each demand different anchors and screws, and guessing wrong turns a simple job into a patched-up mess. Take ten minutes to figure out what you are actually drilling into before you even look at a mount.
Positioning deserves the same attention. Instead of wrestling with the bracket later, mark your ideal height and angle on the wall first. Use a level, check for studs or hidden pipes, and adjust the marks until they feel right. A little chalk or painter's tape now saves a crooked install and a lot of frustration.
Once the wall is sorted, the bracket choice almost makes itself. You will know what load the surface can handle and where the hardware can go, so the mount becomes a simple matching task rather than a guessing game. Start with the wall, and the rest falls into place.
Why Bolt Spread Matters More Than Plate Thickness
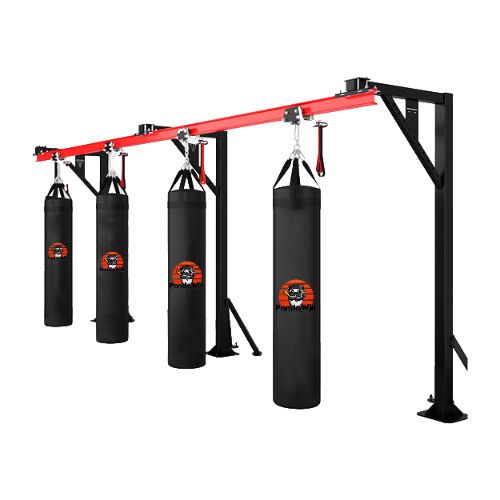
A wider bolt pattern changes the joint mechanics more fundamentally than adding extra plate thickness. The separation between bolts controls the lever arm that resists rotation and pull-out, so for the same applied load, a spread-out pattern reduces the force each fastener has to carry. Thickening the plate only improves behavior locally under the washer; it does little to lower the overall demand on the anchor group.
Many failures blamed on thin plates are actually the result of bolts being clustered too closely. When anchors sit near each other, the stressed material around each one overlaps, and the effective capacity drops sharply even if the plate is quite thick. Moving the bolts farther apart reduces that overlap and engages more of the base material, which often outweighs an extra millimeter or two of steel.
Plate thickness still has a role, mainly in preventing local bending and spreading bearing stress. But if the bolt spread is tight, a thicker plate can still yield around the holes or push load into a small, overstressed zone. In most cases it is better to rearrange the fasteners first, then choose the minimum thickness needed to control local flexure.
Steel Grades That Survive Years of Impact
Impact rarely comes in a single, clean hit. It arrives as a thousand small collisions, a steady grind of rock against plate, or the sudden crack of a falling boulder. That's why grade selection starts with the abuse pattern, not just the material spec. Abrasion-resistant steels like AR400, AR450, and AR500 are built around surface hardness, measured in Brinell units. AR400 offers a workable balance for moderate sliding wear and occasional impact, while AR500 brings a harder face that shrugs off deep gouging in crusher liners, skid plates, and excavator buckets.
Manganese steel, often called Hadfield steel, takes the opposite approach. It leaves the mill at around 200 HB but work-hardens rapidly under repeated blows, with the surface climbing past 500 HB while the core stays tough enough to absorb shock without cracking. Rock crusher jaws, impact hammers, and railway frogs lean on this ability to get harder exactly where the impacts land. The trade-off is real: a part that erodes slowly may still fail early if the grade is too brittle, and a ductile part may wear out fast if it lacks surface hardness. Matching the steel to the specific failure mode prevents most premature replacements.
Weldability and heat control separate a long service life from a costly experiment. High-hardness AR grades require low-hydrogen rods, proper preheat, and controlled interpass temperatures, otherwise the heat-affected zone softens and becomes the next failure point. Shops that skip these steps often see cracks radiating from a repair weld within weeks. For impact-heavy equipment, the best results come from combining the right grade with careful joint design and a wear-monitoring schedule that replaces parts based on measured thickness loss, not a calendar.
The Case for Through-Bolting Over Lag Screws
Most wood-to-wood connections that bear real weight eventually reveal the limits of lag screws. A lag screw threads into the receiving member, but it's only as strong as the wood fibers gripping those threads. Over time, moisture cycles and repeated loading can compress those fibers, causing the screw to lose bite. Through-bolting changes the mechanics entirely: a machine bolt passes through both pieces and pulls them tight with a nut and washer, creating a true clamping force that doesn't rely on thread friction alone. That clamping action spreads the load across a much wider area, which is especially valuable in outdoor structures or anything subject to racking.
The difference becomes obvious in shear and vibration. Lag screws can work loose when joints flex, because the threads are essentially cutting a path they can back out of. Through-bolts, by contrast, stay put—they're tensioned fasteners, and the nut locks the assembly in place even if the wood shrinks slightly. You also get a more predictable failure mode: a lag screw will suddenly pull out or snap under overload, while a through-bolt tends to bend or deform the surrounding wood slowly, giving visible warning before failure. That margin matters when the connection is holding up a deck, a swing, or a header.
There's a reason engineers default to through-bolts for structural connections: they can be torqued to a known spec, inspected visually from both sides, and retightened years later if needed. Lag screws hide their condition inside the wood, and a corroded shank can fail without ever loosening. The extra step of drilling an accurate through hole and reaching the back side is a small price for a joint that won't quietly lose its grip. If the load is serious enough to question the fastener, through-bolting is usually the answer.
How Vibration Slowly Ruins Strong-Looking Brackets
Vibration doesn't announce itself with cracks or loud snaps. It works quietly, loosening what appears to be a rock-solid bracket one microscopic slip at a time. Each cycle of movement—whether from a nearby motor, wind gusts, or repeated loading—acts like a slow saw against the material's internal structure. The bracket may look unchanged from the outside, but inside its crystalline lattice, tiny dislocations are already accumulating. With every oscillation, those dislocations travel further, creating slip bands that eventually surface as hairline fractures nobody can see until it's too late.
The real deception lies in the bracket's stiffness. A thick steel plate or a beefy aluminum casting feels immovable to the hand, yet vibration exploits a property known as fatigue limit. Even stress levels far below what would cause immediate bending or breaking can, when repeated millions of times, initiate crack growth from a pre-existing flaw—a tiny inclusion, a machining mark, or a sharp corner. These stress risers concentrate the vibrational energy, turning a seemingly insignificant detail into the birthplace of failure. Over weeks or months, the crack front advances grain by grain, often leaving no visible trace on the surface until the final rupture.
Prevention begins with recognizing that strong-looking is not the same as vibration-tolerant. Brackets need isolation from the source—rubber mounts, spring washers, or dampening layers—to reduce the amplitude reaching the structure. But equally important is design: rounded fillets instead of sharp corners, forged rather than cast microstructures, and surface treatments that eliminate micro-notches. Without these, a bracket may stand rigid through every static test, only to crumble under the relentless, invisible grind of vibration long after the warranty expires.
Ceiling vs. Wall: Which Direction Takes a Beating Better?
Most people never think about which surface absorbs more punishment until a chair gets shoved into a wall or a glass of water tips over upstairs. Walls sit right in the line of fire—doorknobs, vacuum cleaners, kids with markers, furniture legs. Ceilings, by contrast, get ignored until something from above leaks or a light fixture decides to give up. So if you're measuring daily wear and tear, walls clearly take a more consistent beating.
That doesn't mean ceilings are off the hook. A ceiling has to fight gravity every single day, and any weakness in the framing or drywall shows up as sagging or cracking. Water stains from a slow roof leak can ruin a ceiling's finish faster than a scuff on a wall ever could. In that sense, ceilings suffer from fewer but far more dramatic failures. A wall dent is easy to patch; a sagging ceiling often means cutting out a whole section.
Look at it this way—walls need tougher paint or wainscoting in high-traffic zones because they get bumped constantly. Ceilings can usually stay with flat, cheap paint because nobody touches them. But if you have a basement with low ductwork or a garage where people toss boxes around, ceilings take hits too. Neither direction is inherently tougher; it just comes down to what kind of abuse you expect. Walls handle frequency better; ceilings handle neglect worse.
FAQ
Pick a mount rated for at least double the weight of your filled heavy bag. A 100 lb bag should hang from a mount that supports 200 lbs minimum, because the swinging and striking forces create peak loads far beyond the static weight.
Solid concrete, brick, and load-bearing block walls are ideal. Wood-framed walls work only if you anchor into the center of a double stud or a reinforced header. Drywall alone will tear out quickly, so never bolt directly into it.
Check for a dynamic load rating, not just a static one. The mount should have reinforced gussets and a welded or thick plate design. If the spec sheet doesn't mention shock or dynamic capacity, assume it's only for light static use and keep looking.
Heavy-gauge steel, preferably 10-gauge or thicker, with powder coating or zinc plating to prevent rust. Avoid cast iron or thin stamped steel brackets, as they can crack under repeated shock. Stainless steel is even better for outdoor or humid spaces.
Wall-mounted hangers usually work better in small rooms because they keep the bag closer to the wall and free up floor space. Ceiling mounts need a clear swing radius, which can be problematic if you have low ceilings or nearby furniture. Just be sure the wall can handle the leverage.
Yes, brick and concrete are excellent bases. Use wedge anchors or sleeve anchors rated for at least 500 lbs in shear and pull-out. Drill the hole slightly deeper than the anchor, clean out the dust, and torque the bolts to the manufacturer's specification.
Use 3/8-inch or 1/2-inch lag bolts that penetrate at least 2 inches into the stud. Pre-drill pilot holes to avoid splitting the wood. Fasten through the mount's top and bottom plates if possible, and use heavy washers to spread the load.
Check all bolts and the mounting plate at least once a month. Give the bag a few hard swings and watch for any movement, creaking, or drywall dust around the anchors. Tighten everything to the recommended torque, and replace any hardware that shows bending or rust.
Conclusion
Before you spend money on a heavy-duty hanger, look at what you're attaching it to. The wall structure matters more than the mount itself—soft drywall over spaced-out studs will tear out no matter how thick the steel plate is. Bolt spread usually beats plate thickness because a wider pattern distributes impact forces instead of concentrating them at a single point. For steel grades, skip the cheap mild steel and choose a hardened or high-tensile alloy that can flex slightly and return, rather than cracking after a few months. Through-bolting with nuts and washers on the back side holds far better than lag screws, especially in wood that dries and shrinks over time.
Vibration is the silent killer. Even a strong-looking bracket will slowly loosen fasteners and enlarge holes until the whole assembly drops. Use locking nuts, thread locker, or periodic re-tightening to keep things solid. When choosing between ceiling and wall mounting, wall mounts often take a beating better because the load is more compressive against the bracket instead of pulling straight down on anchors. But if your ceiling joist is solid and you through-bolt into it, that can work too—just avoid relying on drywall anchors alone. In the end, the strongest mount is the one matched to the actual structure behind it.
Contact Us
Contact Person: Fei Xu
Email: [email protected]
Tel/WhatsApp: +8618631245578
Website: https://www.pandawinsports.com/